
Different colored icons identify the different people working on the document. You’ll see all their comments, they’ll see yours, and you can see the changes everyone makes.
Collaborating on a presentation.
Preston Gralla / Foundry
You can do more than see each other’s work. Everyone can make comments, and others can respond to them, live. To make a comment, right-click an area and select Comment from the menu that appears. The Comments pane opens on the right. Type in your comment and click the arrow at the bottom of the comment, and everyone can see it. They can then respond, so that comments are threaded, making it easy to follow conversations.
You can open and close the Comments pane by clicking the Comments button towards the top right of the screen. From the pane, you can review people’s comments and make comments of your own.
If you want a co-worker who isn’t actively collaborating on the presentation to know you need their input on one of your comments, in the comment type @ and the first few letters of the person’s name, then choose their name from the list that appears. When you click the arrow to post the comment, they’ll get an email telling them they were @mentioned and linking to the comment in the presentation.
Be aware that how well real-time collaboration works depends on the strength of your internet connection. On slow or flaky connections, you won’t immediately see edits that other people make, and they won’t see yours immediately — there will be a lag. So it’s always best, when possible, to have the strongest connection possible when collaborating.
Use Microsoft 365 Copilot in PowerPoint
For an additional subscription fee, Microsoft 365 business users can use Microsoft’s genAI add-in, Microsoft 365 Copilot, directly in PowerPoint. You can have Copilot draft an entire presentation for you from scratch by describing the presentation in detail.
It can also create individual slides when you ask, can critique a presentation and point out unnecessary slides that can be deleted, and offer design advice. It can do a lot more as well, such as summarizing a slide deck a co-worker creates. If you have a Microsoft 365 Personal or Family subscription, some of those Copilot features are now bundled with your core subscription.
Generate a presentation draft from scratch
Many people will want to use Copilot to create a draft presentation. To do it, on PowerPoint’s opening screen, click the Create with Copilot button on the upper right. A screen appears that lets you describe your presentation and select a design for it.
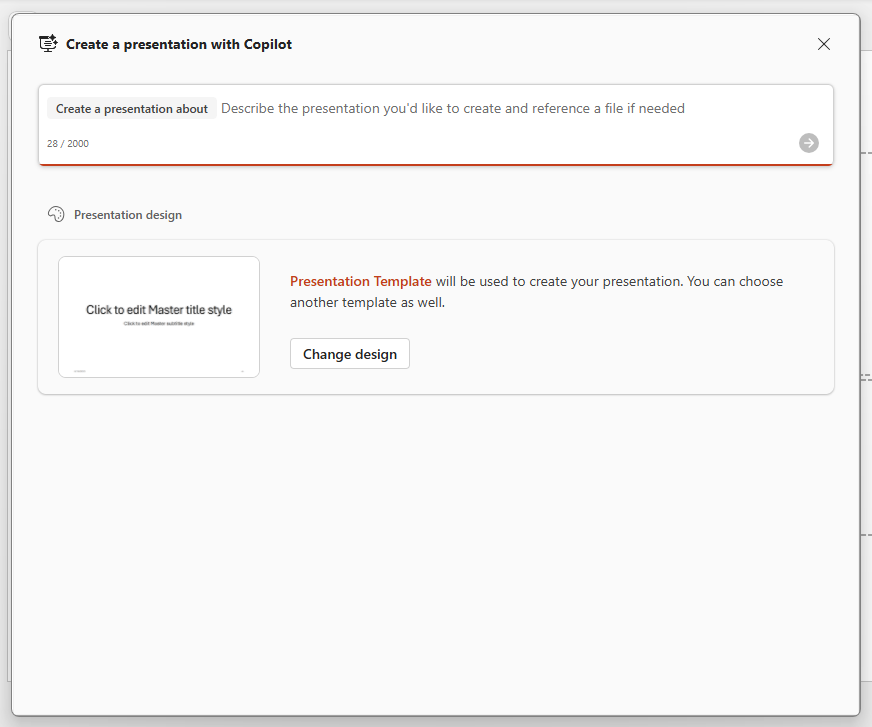
Here’s where you type your prompt for Copilot to create a presentation.
Preston Gralla / Foundry
Describe the presentation in as much detail as possible, including not just the content, but the number of slides, tone and so on. Note that you have a 2,000-character limit. Underneath that, choose the presentation template Copilot has created for you, or click Change design to choose another one, if another one is available.
When you’re done typing your description, click the arrow to the right of the text input box. Copilot creates an outline of the presentation, showing you an overview of all the slides it will create. If you’re not happy with it, click the Edit prompt button (a pencil icon) to the right of the prompt, and describe in more detail what you’re looking for.
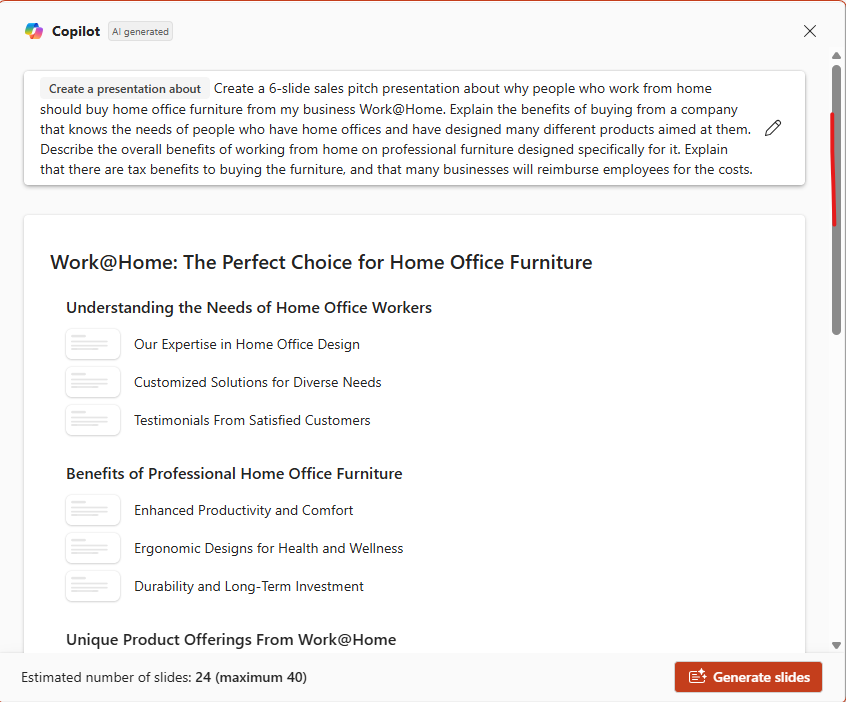
Copilot first presents an outline for the presentation.
Preston Gralla / Foundry
Once the outline looks good, click Generate new presentation, and Copilot will create all the actual slides for the presentation (not just a text outline).
If you want to keep the presentation Copilot created, click the Keep it button at the bottom of the screen and then either keep it as is, or edit it as you normally would in Copilot. (I strongly recommend reviewing and editing any Copilot output.) Click the trash can icon if you want to start over from scratch. If you do that, you’ll be given an option of saving the presentation before starting over, or deleting it entirely.
I’ve found it often takes multiple edits to the prompt to get exactly what you want. I’ve also found that even when I tell Copilot to create a presentation with specific number of slides, it doesn’t listen. Changing the prompt sometimes helps — for example, by emphasizing multiple times that you only want a specific number of slides. Even when you do that, though, you may have to edit the presentation so it’s at the length you want.
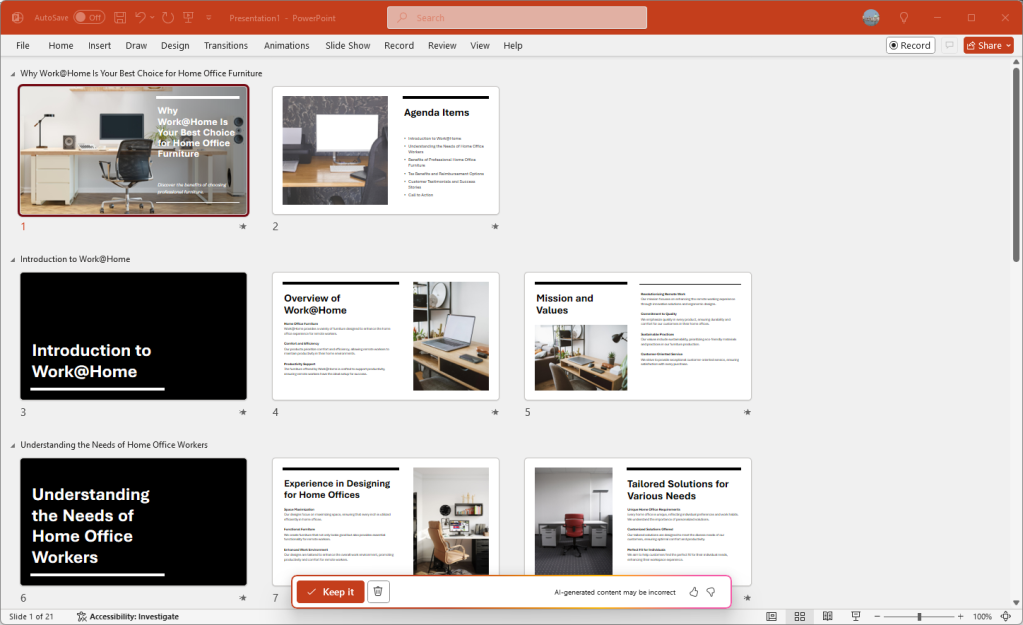
Here’s how the completed presentation generated by Copilot looks.
Preston Gralla / Foundry
Generate a presentation draft from a document
In theory, you should be able to ask Copilot to create a presentation based on an existing document, rather than having to type in a description of what you want. In practice, though, that’s not necessarily true, at least not in my latest tests.
If the file you want to use as a source for your presentation is in OneDrive, you should be able to point Copilot at it, for example, giving its name and location. You should also be able to give Copilot the same “share” link that you send to collaborators, as detailed in the collaboration section of this article.
In my previous tests of Copilot in PowerPoint several months ago, that worked. And, in fact, when I started work on this article, it still worked. But Microsoft is constantly rejiggering Copilot, and in my latest tests, it was no longer able to do that, at least on the PCs I tested it on.
I found two extremely imperfect workarounds that sometimes halfway work. You can launch Copilot by itself from the Windows taskbar — not from inside PowerPoint — and point it at a file and ask it to create a presentation based on it. I did that by typing the following prompt:
Create a 5-slide presentation based on the document “C:UserspgralOneDriveCWColumnMS and OpenAI divorce.docx”
Copilot created the text for the slides, each of which was a bulleted list. I then launched PowerPoint and created a presentation using that text. Kludgy, but at least it worked.
You can also paste the text directly into PowerPoint’s Copilot prompt when you’re creating a new file. However, as a practical matter, that rarely works because of the 2000-character prompt limit.
Get design tips
You can also use Copilot to offer design tips after you’ve created a presentation. To do it, select Ask Copilot, and a Copilot pane appears on the right. You can ask it for general design tips for the overall presentation for individual slides, or you can be more targeted, such as asking for a different style — for example, more professional-looking, “homier,” and so on. Remember, you can keep iterating your suggestions until you get the exact tips you want.

Copilot can offer design tips to improve your presentation.
Preston Gralla / Foundry
Copilot has cannibalized some PowerPoint features
On the downside, Microsoft’s focus on Copilot in M365 has reduced the usefulness of PowerPoint in some ways. For example, there used to be a handy feature called Smart Lookup that let you conduct targeted web searches from inside PowerPoint. But at the beginning of 2025, Microsoft removed Smart Lookup from PowerPoint, saying that the feature has been deprecated.
Now the only way to search the web from inside PowerPoint is via Copilot, which lacks some features of Smart Lookup, notably the ability to highlight words or phrases in a document and trigger an automatic web search. And M365 Copilot isn’t available to business customers unless they pay the additional subscription fee.
The QuickStarter feature, which helped you create presentations, has also been eliminated and its features taken over by Copilot.
Use AutoSave as a safety net while you work
Worried about losing your work on a presentation because you forgot to constantly save it? Worry no more. AutoSave automatically saves your files for you, so you won’t have to worry about system crashes, power outages, PowerPoint crashes, and similar problems. Be aware, though, that it works only on documents that are stored in OneDrive, OneDrive for Business, or SharePoint Online.
You may think you’re already protected against these problems because of the AutoRecover feature built into earlier versions of Office. But AutoSave is significantly different and better than AutoRecover. AutoRecover doesn’t save your files in real time, so it’s easy for you to lose work. Instead, every several minutes it saves an AutoRecover file that you can try to recover after a crash.
But this feature doesn’t always work — for example, if you don’t properly open Office after the crash, or if the crash doesn’t meet Microsoft’s definition of a crash. And Microsoft notes, “AutoRecover is only effective for unplanned disruptions, such as a power outage or a crash. AutoRecover files are not designed to be saved when a logoff is scheduled or an orderly shutdown occurs.” And the files aren’t saved in real time, so you’ll lose several minutes of work even if all goes as planned.
AutoSave is turned on by default in PowerPoint for Microsoft 365 for .pptx files stored in OneDrive, OneDrive for Business, or SharePoint Online. To turn it off (or back on again), use the AutoSave button on the top left of the screen.
Using AutoSave may require some rethinking of your workflow. Many people are used to creating new presentations based on existing ones by opening the existing file, making changes to it, and then using Save As to save the new version under a different name, leaving the original file intact. Be warned that doing this with AutoSave enabled will save your changes in the original file. Instead, Microsoft suggests opening the original file and immediately selecting File > Save a Copy (which replaces Save As when AutoSave is enabled) to create a new version.
If AutoSave does save unwanted changes to a file, you can always use the Version History feature described next to roll back to an earlier version.
Review or restore earlier versions of a presentation
Another useful feature you should know about is Version History, which lets you go back to previous versions of a file, review them, and copy and paste from an older file to your existing one. You can also restore an entire old version.
To use it, with a file open, click the file name at the top of the screen. A dropdown menu appears with the location of the file and a Version History section. Click Version History, and the Version History pane appears on the right side of the screen with a list of the previous versions of the file, including the time and date they were saved.
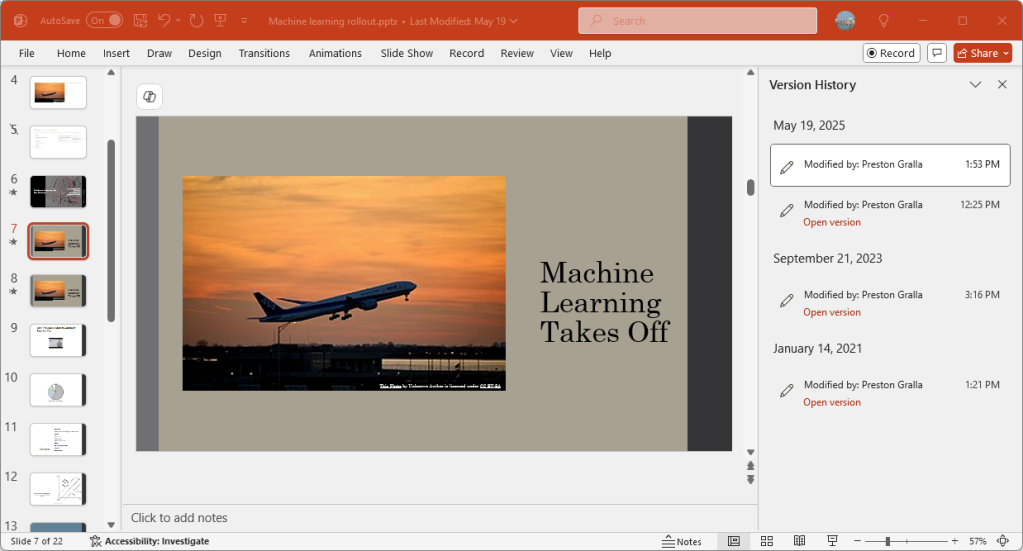
Scrolling through previous versions of a presentation.
Preston Gralla / Foundry
Click any older version, and that version appears in a new window. Scroll through the version and copy any content you want. You can also overwrite your existing presentation with the earlier version or save the earlier version in a separate file.
Version History works best when used in conjunction with AutoSave. You can use it without AutoSave, but it’s not as useful because you don’t get as many saved versions to go back to.
Other useful PowerPoint for Microsoft 365 features
PowerPoint for Microsoft 365 has several more recent additions that are useful. Although they’re not as significant as the other features we’ve covered here, they’re worth knowing about.
Insert 3D models: This visual trick lets you show full three-dimensional details of an object. Select Insert > 3D Models and choose the 3D model you want to insert, either from your computer or from an online Microsoft library. Once it’s inserted, you can tilt or rotate the model any way you want during your presentation.
Text highlighter: Here’s a simple way to draw people’s attention to specific pieces of text: Use the new text highlighter to choose different colors to emphasize different portions of your presentation. It’s the same highlighter that Word has had for some time. To do it, select the text you want to highlight, then choose the Home tab, click the arrow next to the Text Highlight Color button (it looks like a highlighter pen), and choose your color from the dropdown.
Easier background removal: After inserting a picture, you can remove its background as a way to focus on the photo’s subject or a detail. In earlier versions of PowerPoint, you could remove backgrounds but had to use the drawing tools to select and fine-tune the item you wanted to keep; now the process is more automated. To do it, select the picture whose background you want to remove, then select Picture Format > Remove Background.
Royalty-free images: To get access to thousands of royalty-free images, icons, and stickers, go to Insert > Pictures > Stock Images, select the type of image you’re looking for from the top of the screen, and scroll though the images. You can also do a search for images as well.
Use a Bluetooth-enabled pen to control a presentation: If you’ve got a Bluetooth pen like the one that comes with a Microsoft Surface device, you can use its button as a clicker to move to the next slide or a previous one. First pair the pen with your computer. Then go to the Windows Settings app and select Bluetooth and devices > Pen & Windows Ink. Under Pen Shortcuts, check the box next to Allow apps to override the shortcut button behavior. A single click will now move to the next slide in a presentation, and holding down the button will move one slide backward in the presentation.
Record a presentation: You can record your presentation ahead of time and then share it with others. Click the Record button toward the top right of PowerPoint, then select either From beginning or From Current slide. You can choose from three views: Teleprompter, Presenter, and Slide. You can pause and retake the video as many times as you want. When you’re satisfied, click Export. You can then share the video with anyone you want. See Microsoft’s video recording blog post for details.
Use keyboard shortcuts
Using keyboard shortcuts is one of the best ways to accomplish tasks quickly in any version of PowerPoint. For instance, when you’re creating a presentation, you can press Ctrl-M to add a new slide. When you’re giving a presentation, you can press Ctrl-L to start the laser pointer. See “Handy PowerPoint keyboard shortcuts for Windows and Mac” for our favorite shortcuts.
This story was originally published in February 2021 and most recently updated in August 2025.
[ More Microsoft 365 cheat sheets, tips and tricks ]
Read the full article here