Share files or folders in OneDrive for Web
Move the pointer over the file or folder that you want to share. Click the Share icon — a square with an arrow over it — that appears to the right.
Click the Share icon to begin sharing a file.
IDG
The Share panel opens. (From this point on, the steps for sharing a file or folder are generally the same as in OneDrive in Windows.)
Note: If you’re using a Microsoft 365 account that’s owned by your company, the options for sharing a file or folder in your OneDrive may be restricted by your IT administrator. Depending on the type of Microsoft account you’re using, you may see slightly different interfaces and options than those shown here, but the sharing process should be similar.
Share a file or folder with specific people
In the Share panel, you can invite specific people to access the file or folder in your OneDrive. Enter their email addresses in the first field. If they’re in your Outlook contacts, you can start typing their name and select from the suggestions of people that pop up.
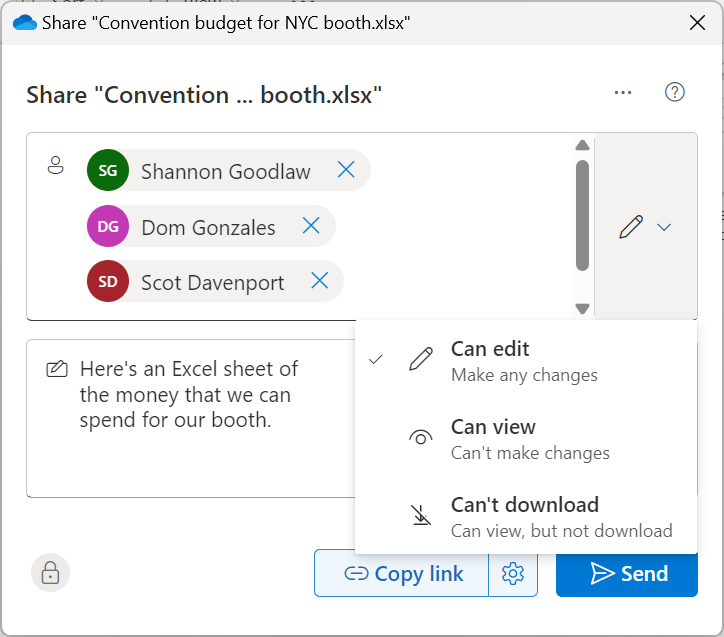
Sharing and setting access permissions for a OneDrive file.
IDG
Click the pencil icon to the right to change the access level to your file or folder. Depending on your Microsoft account or Microsoft 365 account, you may see some or all of these options:
- Can edit: The people you’ve invited can view your file or folder (and its contents), download it, forward its link to others, and make changes to it (including contents in a folder). For example, if it’s a Word document, then a person viewing it can edit it with Word. This also means that when they edit your file or folder, their changes overwrite the original copy in your OneDrive.
- Can view: Invitees can view your file or folder, download it, and forward its link to others — but they can’t make changes to the original file or folder (or its contents) in your OneDrive.
- Can review: If the file being shared is a Word document, this option will appear. The person you share the document with will be able to add comments or make suggestions to it in the Word app, but they won’t be able to make actual edits to it.
- Can’t download: Invitees can view the file or folder but can’t download it.
You can also enter a brief message for the recipients to read, and then click the Send button. An email will be sent to these people that contains a link to your file or folder that only they can open.
Share a file or folder with all your co-workers
If, instead of inviting specific people, you want to share the file or folder with everyone in your organization, click the gear icon, which may appear toward the upper right of the Share panel or at the bottom next to the “Copy link” button, depending on your account type.
A “Link settings” panel appears. Select People in [your organization name] to share the file or folder with all your co-workers.
In the “More settings” area below, you’ll see the same access permission options as on the main Share panel — so you can, for instance, change Can edit to Can view. Users with certain Microsoft 365 accounts can also set an expiration date after which the link to the shared file or folder will no longer work, as well as password-protect the file or folder.
After you’ve made your selections, click the Apply button. This returns you to the Share panel, where you can click Send to send the invitation email.
Share a file or folder via public link
Another way to share a OneDrive file or folder is with a public link. We strongly advise not using this method with files or folders that contain sensitive data. (Some organizations turn off this capability.)
On the aforementioned Share panel, click Copy link, and a link to your file or folder is copied to your PC clipboard. You can then share this link with other people — but before you do, it’s wise to think about sharing permissions.
By default, anyone who clicks this public link can view your file or folder (and its contents), download it, forward the link to others, and make changes to the file or folder (including the files in a folder).
To change the access setting of this public link, click the gear icon next to the “Copy link” button or at the upper right of the Share panel. This will open the “Link settings” panel, where you can change access permissions, set an expiration date, and/or password-protect the file or folder as described above.
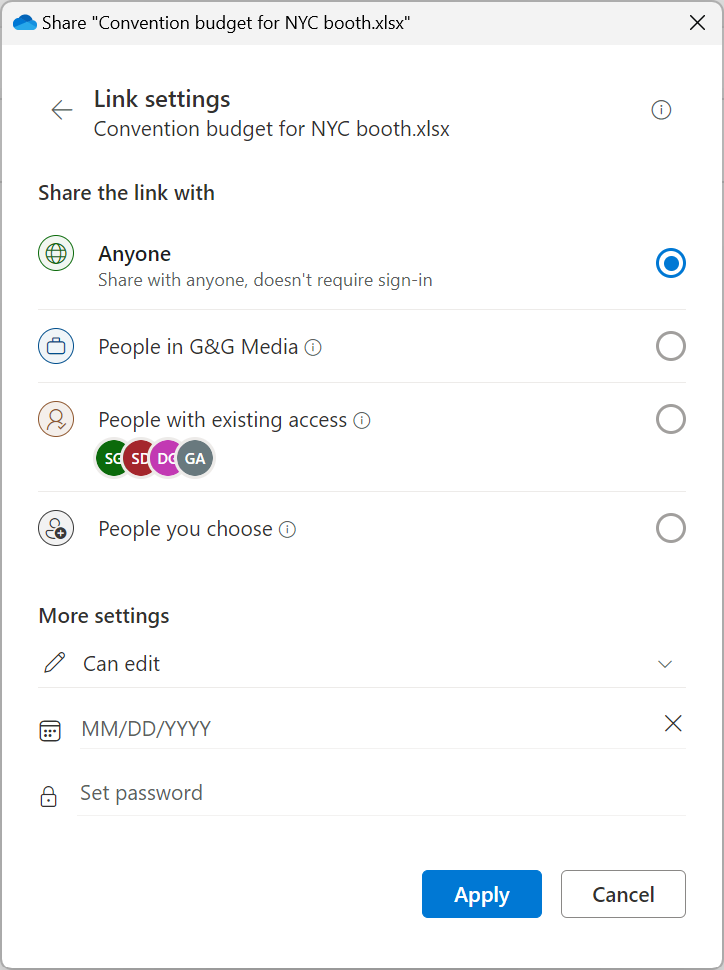
Use the “Link settings” panel to change who you invite and fine-tune access permissions.
IDG
Or, if you change your mind about sharing the link publicly, select a different recipient group from the “Share the link with” list, such as people in your organization, people who already have existing access to your file or folder, or people you specifically choose to invite.
After you’ve made your selections, click Apply, which returns you to the Share panel. Click the Copy link button. You can now share this link with other people by pasting it into a document, email, message, etc.
Note: The quickest way to create a link to publicly share a file or folder in your OneDrive is to right-click the file or folder and select Copy link from the menu that appears. A link will be created using your default permissions, which you can adjust by clicking the “Settings” icon on the “Link created” pane that appears.
Stop or manage sharing for a file or folder
Select My files in the left pane. Move the pointer over the shared file or folder, click the three-dot icon, and select Manage access.
On the Manage Access panel that opens, you can click Stop sharing to stop sharing the file or folder completely.
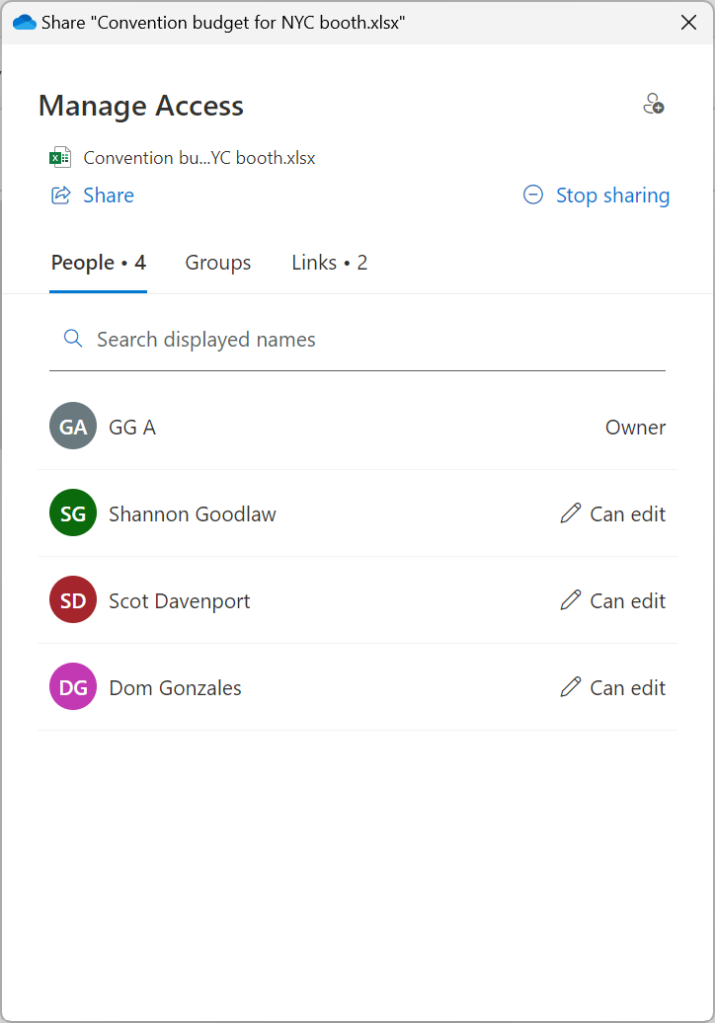
You can manage access permissions or stop sharing a file or folder at any time.
IDG
To manage access permissions for a person, on the People tab, click the permission next to a person’s name to change it — for instance, from Can edit to Can view. You can do the same for groups by clicking the Groups tab.
To manage shared links, click the Links tab. To stop sharing a public link, click the trash can icon by the link. Or click the gear icon if you want to change the access settings for the link to your file or folder.
New Copilot genAI features in OneDrive for Web
Microsoft recently added Copilot AI functions that you can use to take actions on Word documents, Excel spreadsheets, PowerPoint presentations, and (some) other files stored in your OneDrive. For instance, Copilot can quickly summarize a lengthy Word doc without you even having to open it. These functions only work through OneDrive for Web — they’re not available in your OneDrive through Windows File Explorer or Mac Finder.
Notes:
- These AI functions are available only with a Microsoft 365 Personal or Family subscription, a Copilot Pro subscription, or a Microsoft 365 Copilot subscription for business.
- Under a Microsoft 365 Personal or Family plan, you’re allotted 60 AI credits (requests to Copilot) per month. If you have a Copilot Pro or M365 Copilot plan, there are no limits to accessing Copilot.
- According to Microsoft, Copilot in OneDrive supports most text-based files, including Word documents, Excel spreadsheets, PowerPoint presentations, newer Microsoft 365 formats like FLUID and LOOP, OpenDocument formats (ODT and ODP), Web files (ASPX, HTM, and HTML), and universal formats such as PDF, TXT and RTF files. File size is currently limited to 150MB. The company says support for images, videos, meeting recordings, and OneNote notebooks is coming soon.
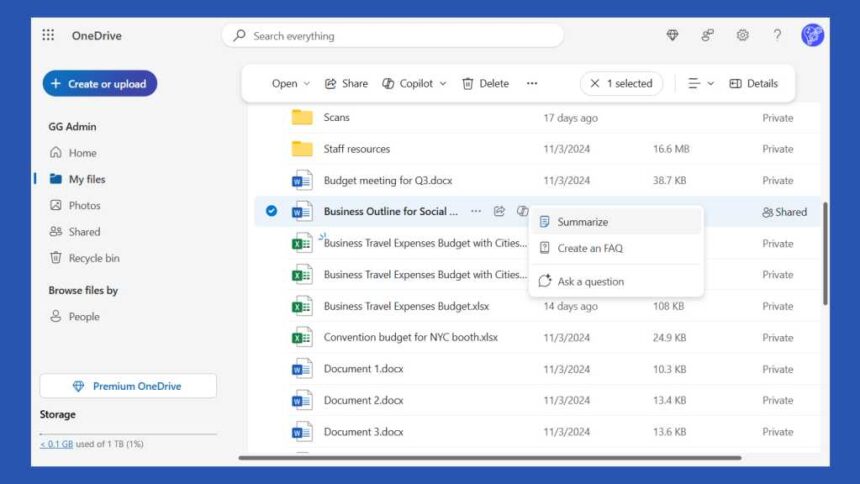
Summarize a file, create an FAQ from it, or ask a question about it
Move the pointer over file and click the Copilot logo that appears by its filename. From the menu that opens, select Summarize, Create an FAQ, or Ask a question.

Click the Copilot logo next to a file and choose an option.
Howard Wen / Foundry
Summarize and Create an FAQ: When you select either of these options, a panel opens over the screen. Copilot will analyze your selected file, then generate a summary or a list of “frequently asked questions” (and answers) based on its content. The resulting text will appear in the panel.

Copilot can generate a summary of or FAQ list for a file.
Howard Wen / Foundry
Then you can…
- Click the thumbs up or thumbs down icon to rate the quality of the result.
- Click Copy. The text that Copilot generated will be copied to your PC clipboard.
- Ask a question is the same choice that appears on the prior menu, described below.
Ask a question: Clicking this option will open the Copilot chat panel along the right of the screen. In the entry box along the bottom of this panel, you can type a command or question to prompt Copilot to generate a response.
For example, if you selected an Excel spreadsheet, you could try asking Copilot: “What’s the most expensive item in this spreadsheet?” If it’s a PowerPoint presentation: “What are the key points mentioned in this slideshow?”
Or, along the lower right of the entry box:
- Click the View prompts icon (with the star) to view suggested prompts that you can select for Copilot to respond to.
- Click the microphone icon to turn on your PC’s microphone so that you can speak your command or question.
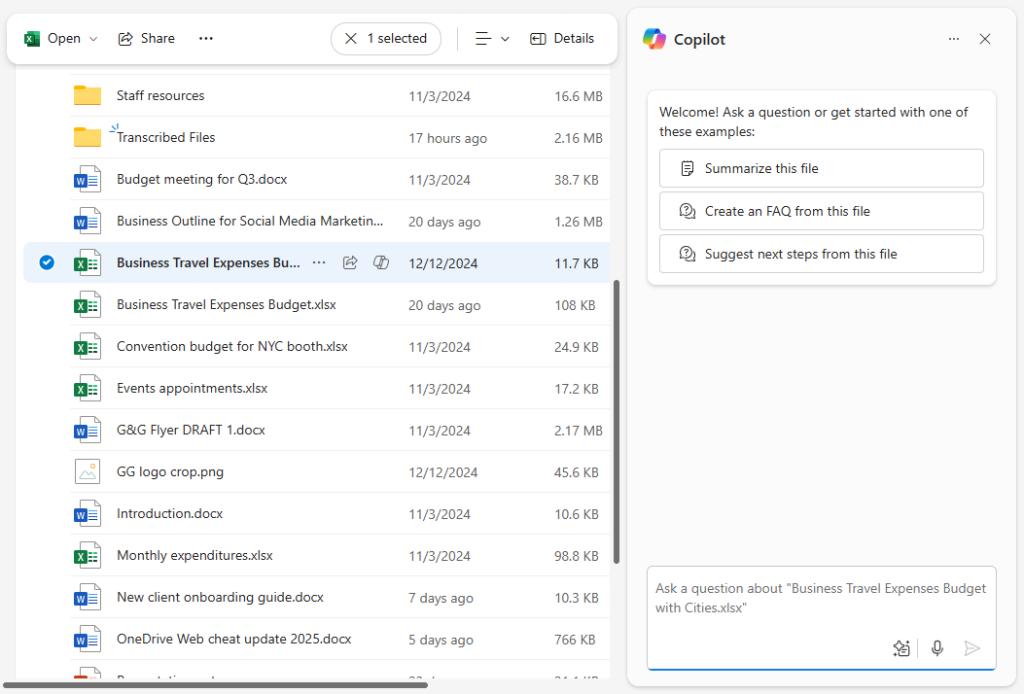
You can enter a question about your file at the bottom of the Copilot chat panel.
Howard Wen / Foundry
Once you’ve entered a question or prompt, Copilot will analyze your request and try to generate a response. You can copy its resulting text to your PC clipboard, and rate it with a thumbs up or down. Or you can keep chatting with Copilot about the file, asking follow-up questions in the chat box.
Summarize, compare, or ask questions about more than one file
You can select up to five files (any combination of supported file types), and then instruct Copilot to generate a summary of their contents, list differences among them, or open the Copilot panel to ask questions or make other requests.
Select My files on the left pane, then select up to five files in the main file list. On the toolbar above this main pane, click Copilot and choose one of the options from the menu that appears.
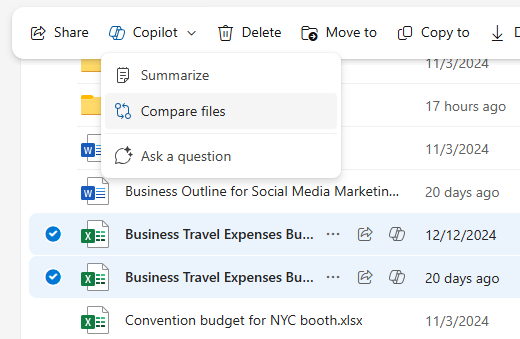
Select multiple files in your My files list, then ask Copilot to summarize, compare, or chat with you about them.
Howard Wen / Foundry
If you select Summarize or Compare files, a summary of all selected files or comparison noting the major differences between selected files will appear in a panel over the screen. Choosing Ask a question will open the Copilot chat panel, where you can ask questions about all the selected files.
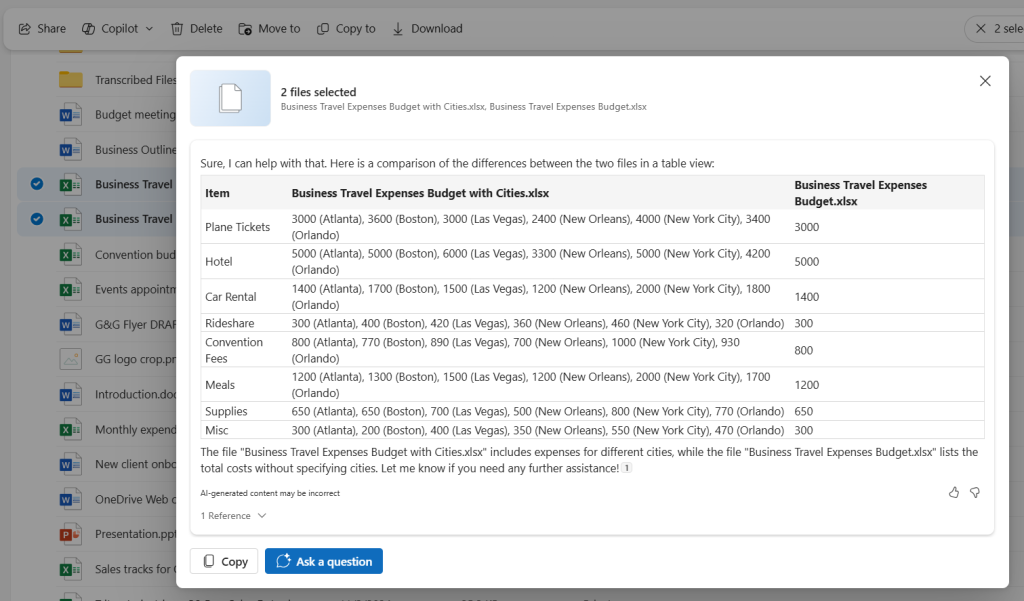
A Copilot-generated comparison of two Excel spreadsheets.
Howard Wen / Foundry
More Copilot features on the way
In addition to the aforementioned functions, the Microsoft 365 Roadmap lists several more Copilot features for M365 Copilot business customers that have just been launched or are in the process of rolling out in OneDrive for Web, including generating audio summaries of files, asking Copilot questions about images and meeting recordings, converting Word documents to PowerPoint presentations, and Copilot Agents (assistants powered by AI that you set to do tasks for you).
It’s likely that some, though not all, of these features will eventually make their way to M365 Personal/Family and Copilot Pro users as well.
OneDrive for Web: Worth another look
Microsoft has poured considerable resources into beefing up the web versions of its Microsoft 365 apps, and this effort has clearly paid off in OneDrive for Web. If you haven’t used the web version of OneDrive in a while, it’s worth another look as a powerful alternative to using OneDrive within Windows (or Mac). You might find that OneDrive for Web provides a significant productivity boost.
This article was originally published in June 2024 and updated in July 2025.
Read the full article here